

I once thought a survival kit meant duct tape and good intentions. Spoiler alert: it doesn’t.
We’re all conditioned to think of survival as a trek through the wilderness, but my team and I know the truth: you’re far more likely to face a survival situation right in your own backyard. Or at your cubicle.

Our team has over 35 years of experience researching and testing survival gear, from high-end tactical packs to cheap-o flashlights. And, we can tell you a universal truth: a one-size-fits-all survival kit is a myth.
You need to be prepared for the realities of modern life, not just for a worst-case scenario that only happens in the movies.
So, let’s ditch the “tacticool” fluff and get practical. We’ve found the best way to prepare is to create a three-tiered system, based on how “prepared” you want to be.
Table of Contents
- Survival Isn't Just for Bear Grylls: Your Essential Home and Urban Survival Gear
- Disaster Survival List: The Survival Stoic Strategy
- 1. First Aid Kit
- 2. Shelter
- 3. Survival Blanket
- 4. Sleeping Bivy, Bag, or Blanket
- 5. Fire Starting Kit
- 6. Rescue Signal
- 7. Water Filtration and Containers
- 8. Cutting Tools
- 9. Navigation
- 10. Survival Food
- 11. Survival Stove
- 12. Cordage
- 13. Lighting
- 14. Clothing
- 15. Device Charger
- 16. Field Guide
- 17. Self Defense
- 18. Other Survival Items
- 19. Documents
- 20. Morale and Mental Fortitude
- Customizing Your Survival Kit for Your Reality
- Tailoring Your Kit: Essential Supplies for Every Family Member, Pet, and Special Need
- Maintaining and Storing Your Survival Kit
- Get Familiar with Your Survival Gear
Survival Isn’t Just for Bear Grylls: Your Essential Home and Urban Survival Gear
We spend a lot of time talking about surviving out in the wilderness. But the truth is that a lot of survival takes place at home. Natural disasters hit suburbia everyday. You probably won’t be out in the woods when disaster hits.
Your trusty camp stove isn’t going to cook for a family of four for a week. So, we need to build a new kind of survival kit. One for when you’re hunkering down at home, not hoofing it through the woods.
This section is all about what the pros recommend for when things go sideways in the real world.
Basic Household Disaster Kit
This is your basic kit for your household when you’re told to “shelter in place.” This isn’t about roughing it in the woods. It’s about staying alive (and somewhat comfortable) until things go back to normal.
- Water: Pretty much everyone agrees that you need to have at least one gallon of water per person, per day. Preferably, you should have a three-day supply in high-quality water storage containers.
- Food: We’re talking about non-perishable, easy-to-prepare stuff. Long-lasting canned goods are a great place to start, but if you want to be prepared today, consider an emergency food kit.
- Flashlight & Radio: Don’t rely on your phone’s flashlight. That battery will be dead faster than you think. Instead, use a battery-powered or hand-cranked emergency radio is a lifesaver for getting critical news. No TV, no internet, just pure, unadulterated information. Pair with a survival flashlight for redundancy.
- First Aid Kit: A basic survival first aid kit is fine, just make sure that you get one to treat serious injuries, not just a bunch of band-aids. Make sure to have a week’s supply of any personal medications you or your family needs, too.
- Crucial Documents: You’re going to need these. I keep a folder with copies of birth certificates, passports, insurance policies, and a list of emergency contacts. It’s one of those things you hope to never need, but when you do, you’ll be glad you have it.
Urban Survival Considerations
Life in the city comes with it’s own set of problems in an emergency. You have a roof over your head, but what if a gas line breaks or the building needs to be sealed off? Here is some essential urban survival gear you should have ready-to-go at home:
- A Manual Can Opener: That fancy electric one on your counter is just an expensive paperweight without power. A simple, old-school can opener is your best friend when you’re trying to get to that last can of chili.
- A Wrench for Utilities: I keep a simple adjustable wrench in my kit. Why? Because if there’s a disaster, you may need to turn off utilities like gas or water. It’s the ultimate homeowner’s “I’ve got this” tool.
- Plastic Sheeting & Duct Tape: This sounds dramatic, but it’s a critical safety measure. You can use it to seal off a room from contaminated air. It’s not something you want to improvise in the moment.
It’s about being prepared for what’s most likely to happen in the area you live in, not for what you saw in the movies. This gear is practical and unassuming (and it might just save your butt).
Disaster Survival List: The Survival Stoic Strategy
We firmly believe that thinking through the scenarios you may face is a big part of training your mindset for survival. If you are on a hike and get lost or injured, you have already mentally prepared for it. This will allow you to think, not panic, and execute your plan.
Part of this is building your own survival kit. This way, you will know each item and why you have it.
To understand your survival priorities, review our guide on the Survival Rule of 3. This guide provides guidelines that are the basis of designing your gear list.
While it is easy for me to just throw the kitchen sink at you with the longest survival gear list known to man, a more practical approach is to use a multi-level system. Depending on your situation, carrying a huge amount of gear may not make sense. You can’t carry everything you might need. You have to pick and choose.
I like to choose my survival gear based on the distance I plan to travel. Below, I have divided the items above into a survival kit for levels 1, 2, and 3.
Each level is based on a distance. I use the furthest distance I plan to be away from my vehicle or camp at any time.
For each level, also consider the number of people in your group. I have listed each item either per person or per group. For some items, you only need one, even if you have many people.
Here’s a quick explanation of what each level kit means. Pick which level you’d like to prepare for, and then keep reading to grab the exact gear you need.
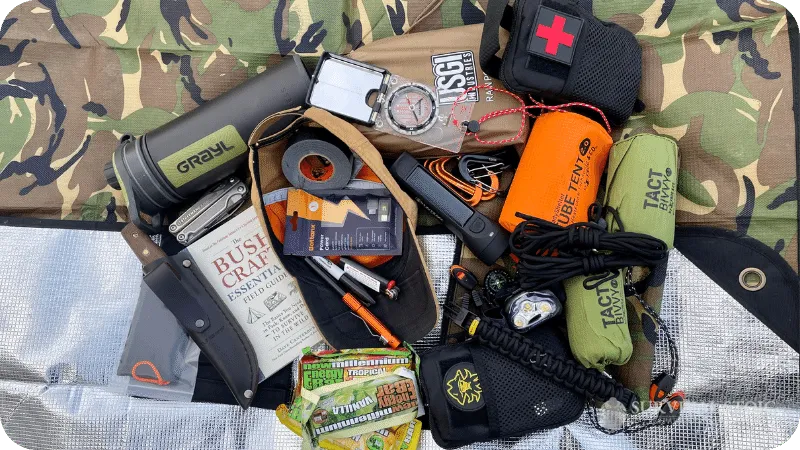
Level 1 Survival Kit
This is the bare minimum you should have on hand. If you are hiking, camping, backpacking, hunting, or just spending time outside in a remote area, make sure these items are part of your base survival kit. For a day hike, for example, the furthest distance away from safety should be less than six miles.
Level 2 Survival Kit
This level assumes that you will be camping overnight. The furthest distance traveled away from safety should be less than 12 miles.
Level 3 Survival Kit
This level is typically for thru-hiking or backpacking. You would travel from one destination to another over 12 miles.
One more note for the items below. Use our discount codes below to save money:
- 10% off any item at Outdoor Element with code “survivalstoic”
- 10% off any item at Bigfoot Bushcraft with code “survivalstoic”
- 15% off any item at My Medic with code “survivalstoic15”
- 10% off any item at Nutrient Survival with code “SS10”
1. First Aid Kit
This should be your priority over other items. If you or someone in your group has a major injury, you will be at a huge disadvantage even just a few miles from your destination.

Your run-of-the-mill first aid kit is a great start. It’s got the bandages, the antiseptic wipes, and maybe a little packet of Neosporin. We all have one, and we all hope we never need it.
But when a real disaster strikes, a few Band-Aids won’t help you much. My own experience has shown me that a truly prepared kit goes far beyond a few cuts and scrapes. Our resident veteran recommends gear to treat major injuries, too.
Medications
Don’t assume you can get a prescription refilled. Ever. If you need your medication, getting some extra in your bug-out bag should be one of your first steps:
- Prescription Meds: Pack at least a 7-day supply of all your prescription medications. Just put them in a separate waterproof bag.
- Over-the-Counter Drugs: I personally keep a small stash of essentials. Think pain relievers for headaches, anti-diarrhea meds for, well, you get it, antacids for stress-related heartburn, and laxatives because… well, things get stressful out there.
Vision & Personal Hygiene
This might sound like a luxury, but I promise you it’s not. I once tried to navigate with a map and couldn’t see a thing because I’d previously lost my contacts. My tactical advantage was zero.
If you wear glasses or contacts, this is a legit survival item. Pack a spare pair of prescription eyeglasses and a small bottle of contact lens solution. It’s that simple.
Blake, our resident veteran, also emphasizes that hygiene is exceptionally important in a survival situation, even if it is one of the first things people tend to let slip. Good hygiene prevents the spread of disease in a chaotic, unsanitary environment. Here’s what my team and I always pack:
- Soap & Hand Sanitizer: Keep your hands clean. It’s the number one way to prevent illness.
- Moist Towelettes: They’re great for a quick “shower” or to clean up a mess.
- Garbage Bags with Ties: These are a multi-purpose lifesaver. Use them for waste disposal to keep your area sanitary.
- Feminine Supplies: A non-negotiable for any woman.
My Favorite Aid Kits:
- Level 1 Kit: Mountain Man Medical Tracker Kit (1 per 2 people)
- Level 2 Kit: My Medic Sidekick (1 per 2 people)
- Level 3 Kit: Mountain Man Medical Basecamp Kit (1 per group)
- All Levels: N95 Mask – AccuMed BNX N95 Mask (1 per person)
- All Levels: Medication – My Medic Medication Pack (1 for 2 people)
- All Levels: Trash Bags – 55 Gal Contractor Trash Bag (1 per person)
2. Shelter
Maintaining our body heat is the second priority in a survival situation. When our body gets too hot or too cold, hypothermia or heat exhaustion can set it quickly. This will greatly reduce your ability to perform all of the other actions needed to survive.
We are at the most risk of losing body heat at night when temperatures are cooler and we are not as active. An easy way to think of shelter is you need something to sleep in, on, and under.

Sometimes, you may be camping and already have a tent to sleep in. Shelter becomes important when you don’t expect to be out overnight. For example, you plan for a day hike but get lost.
There are two basic ways to prepare here. Bring your shelter with you or build one. These guides can help you decide.
- Bushcraft and Survival Shelters
- Best Bushcraft and Survival Tents
- Best Bushcraft and Survival Tarps
- Best Tent Stakes for Survival
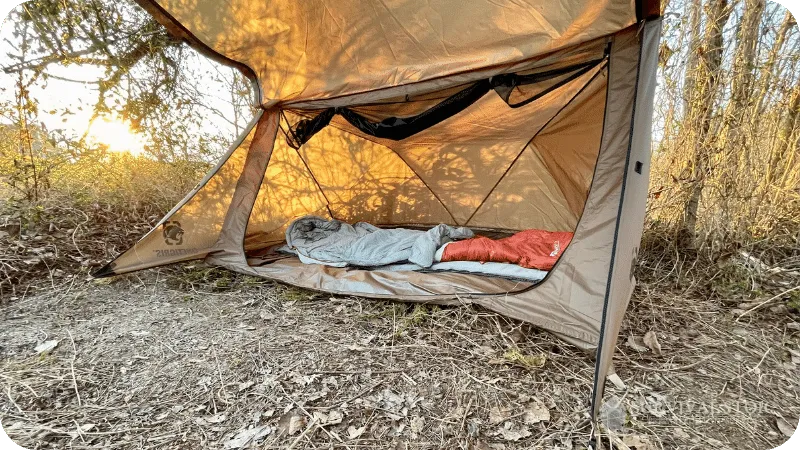
Building your own shelter can take time. Therefore, at a minimum, I recommend an emergency tent in your survival kit. They can be used in a variety of ways, are lightweight, and have kept me dry on rainy nights.
A lightweight tarp is a good option for additional protection. Also, consider a lightweight tent like the One Tigris Bushcraft Shelter 2.0. It sets up similar to a tarp but has full sides and a bug net, so it offers more protection than just a tarp or emergency tent, however it does weigh more.
Critical Items:
- Level 1: Survival Frog Emergency Tent (1 for 2 people) Also here on Amazon
- Level 2: Survival Tent Stakes – Coghlan’s ABS Tent Stakes (6 for 2 people)
- Level 2: Lightweight Tarp – Aquaquest Safari Tarp (1 for 2 people)
- Level 2: Tarp alternative – One Tigris Survival Shelter (1 for 2 people)
3. Survival Blanket
This item will help supplement a survival shelter by insulating you from the ground—it is something to sleep on. It is not a thin, cheap emergency blanket, but a waterproof blanket with a reflective side.

It can also be used as a signal to rescuers or to reflect the heat from a fire into a shelter. Since it is waterproof, it protects from soggy ground.
From the Field
I personally view my emergency blanket as a backup to my backup. Your first line of defense against the cold is your clothing and shelter. An emergency blanket is great to have in a pinch, but you should never rely on it as your primary source of insulation.
I keep one of these in my truck along with my survival gear. It is lightweight and versatile.
Also check out our guide to the Best Emergency Blankets for more options for staying warm.
Critical Items:
- All Levels: Arcturus Survival Blanket
4. Sleeping Bivy, Bag, or Blanket
This item is the third component of maintaining body heat – it is something to sleep in.
If you do not plan to spend the night outside, take an emergency Bivy. They are small, lightweight, and can get you through the night.
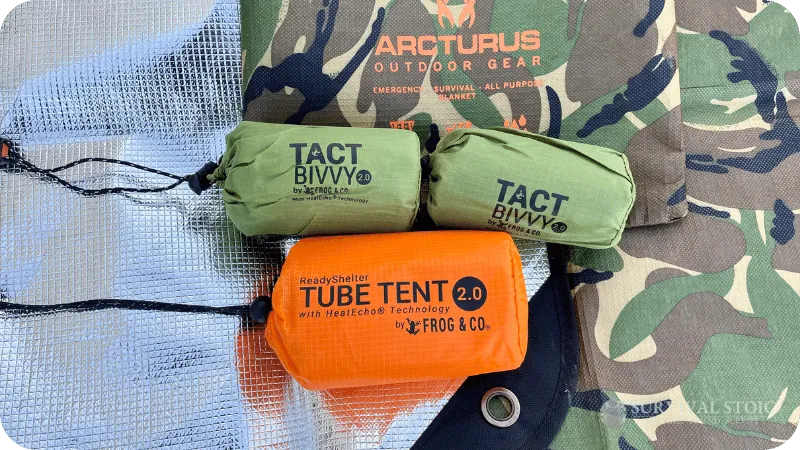
Sometimes, you may already have a sleeping bag and plan to spend the night outside. Ensure you have a bag rated for at least 20 degrees cooler than the expected low temperature. I like to supplement my sleeping bag with a wool camping blanket in cold weather.
See our guide to the Best Wool Camping Blankets for some good choices. Also see our Ampex Gear Review for my favorite sleeping bag.
If weight is a concern and I have a tent, I use the survival blanket above or an emergency Bivy for additional coverage if I need it.
Critical Items:
- Level 1: Emergency Bivy – Tact Survival Bivy (1 per person) – Also on Amazon
- Level 2 and 3: Sleeping Bag – Ampex Sleeping Bag (1 per person)
- Level 2 and 3: Wool Blanket – Arcturus Military Wool Blanket (1 per person)
5. Fire Starting Kit
Fire is important for warmth, especially in cold, damp conditions. A small fire-starting kit is easy to purchase or build yourself.

When it comes to starting a fire, you can never be too prepared. I’ve seen a cheap lighter freeze up in cold weather and a ferro rod fail to spark on a damp morning. That’s why I’ve learned from my own mistakes and now believe in a redundancy obsession.
You need multiple ways to make fire because a single-point failure can have catastrophic consequences.
My team and I always carry at least three ways to make fire. We keep a simple BIC lighter in a waterproof container because it’s the easiest and fastest way to get a flame. But for a backup, a Ferro rod is a non-negotiable part of our kits. It works when wet and in extreme cold, so it’s a perfect failsafe.
As for a third option? Some fire tinder that’s waterproof is a must. Bigfoot Bushcraft Fire Plugs are a go-to for me.

See our full survival fire kit guide and our Best Survival Lighters review for more ideas and tips.
Critical Items:
- All Levels: Fire Starting Plugs – Bigfoot Bushcraft Fire Plugs (10 per person)
- All Levels: Ferro Rod – Outdoor Element Fire Flute (1 per person)
- All Levels: Lighter – Bic Lighters (1 per person)
- Level 2 and 3: Fire Starting Kit – Blackbeard Fire Starting Kit (1 per group)
6. Rescue Signal
After first aid and maintaining body temperature, a way to signal for help should be your next priority.
Two basic methods can be used: visual and audible.
Visual methods include a signaling mirror, bright items, and smoke. The Wazoo Cache Cap I mention below in clothing is one of my favorite multi-use items. The inside of the cap is bright orange with reflective strips and can be used as a signaling device. The survival blanket and bivy I recommended above and the bandana in the clothing section below can also be used as a signal.

Since I already have a fire kit, once I have a good fire going, I can simply use green vegetation to create a lot of smoke. There is no need for a separate product to create smoke signals.
Audible methods include whistles, radios, and Satellite communicators. The Tact Bivy and Outdoor Element ferro rod above both include whistles.
GMRS radios are easy to use and have a range of a few miles, depending on the terrain. Before I head out into the woods, I tell someone who is not with me when I expect to be back and that I will call them. If I do not, they are to contact rescuers. I also tell them I will monitor a certain channel on my radio, and rescuers can then contact me on that channel.
Note that the radio I recommend below can be charged via a USB port. Many radios require a desktop stand that uses a standard wall outlet, which is not something you will have out in the wilderness. In this pic are my Hybridlight flashlight (mentioned later) charging my Baofeng GM-15 Radio. See our guide on the Best HAM Radios for more options.

For the ultimate in communication, go with a satellite communicator. Distance doesn’t matter if you have a clear view of the sky.
Critical Items:
- All Levels: Emergency Signal Mirror (1 per group)
- All Levels: Bandana – Colter Stayin’ Alive Bandana (1 per person)
- Level 2 and 3: GMRS Radio – Baofeng GM-15 Pro Radio (1 per group)
- Level 3: Satellite Communicator – Zoleo Sat Com (1 per group)
7. Water Filtration and Containers
We can only last a few days without clean water. Once you’re warm and have a signaling method ready, it’s time to secure a drink. The easiest way to do that is with a water filter.

Now, I’ve seen it all with water filters. And I’ve learned the hard way that you’ve got to trust your gear. That’s why I always test my filters at home with a known good water source before I ever take it out into the field.
After all, you don’t want to find out your filter is busted when you’re 10 miles from the nearest road.
- Filters: My favorite water filter is the Grayl Geopress. It looks and works just like a water bottle. Just press and drink. I don’t have to mess around with bags, tubes, tablets, or anything else. But for an even lighter option, a lot of serious hikers swear by the Sawyer Mini Water Filter. It’s tough, reliable, and removes almost all bacteria and protozoa.
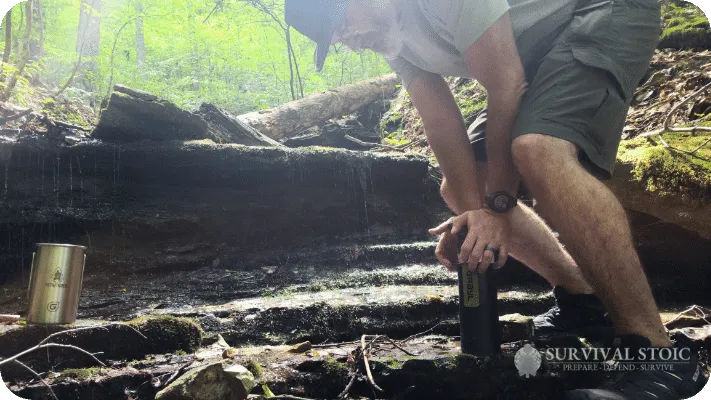
- Boiling: Boiling water is a simple, foolproof method. It’s great for killing pathogens, but it takes time and fuel. This is where a small metal container, like my Grayl nesting cup, comes in handy. It’s perfect for boiling water for a cup of tea or a freeze-dried meal.
- Tablets: Water purification tablets are the lightest and smallest option, but they can leave a chemical aftertaste. Use them as a last-resort backup or when you just can’t make a fire.
No matter which method you use, always have a backup. I carry my Grayl Geopress as my primary filter, but I also keep a few purification tablets and my nesting cup with me at all times.
And don’t forget a backup container to hold water. I prefer a non-insulated Kleen Kanteen stainless steel bottle because I can use it to boil water if I need to.
See our guide to the best survival water filters for more options and how to choose the best filter for you.
Critical Items:
- All Levels: Water Filter – Grayl Geopress (1 per person)
- All Levels: Water Purification Tablets – (10 per person)
- Level 2 and 3: Grayl Patherfinder Nesting Cup (1 per person)
- Level 2 and 3: Backup Filter – Sawyer Mini Water Filter (1 per group)
- Level 2 and 3: Water Bottle – Kleen Kanteen (1 per person)
- Urban Only: Sillcock Key (1 per group)
8. Cutting Tools
Having a knife is an absolute no-brainer for survival. It’s your most versatile tool. But having just one knife is a recipe for disaster. What if you lose it or break it? A single-point failure here could compromise your ability to build a shelter or prepare food.

That’s why I always carry at least two, and often three, knives.
Primary Blade
Anytime you venture out into the woods, make sure you have a full-tang belt knife. My go-to is a full-tang Condor Bushlore Knife. This is for your big tasks, like making kindling, building a shelter, or self-defense. It’s a heavy-duty, reliable blade you can count on.
For all the details on what type of knife you need, see our guide on the best bushcraft knife.
Secondary Utility Knife
I also carry a smaller multi-tool or Swiss Army knife. This is for all the small, fiddly jobs that a big knife can’t handle. Think stripping a wire, opening a can, or repairing a piece of gear. The Leatherman Wave Plus is my top choice here.
See our guides to the best survival multi tool and the best Swiss Army knife for more on both of these.
Folding Saw
Folding saws are one of the best tools for quickly processing wood for fire or shelter. Even a smaller folding saw can cut wood safer and quicker than an axe. In a survival situation, a smaller saw is better since it is lightweight, and we are not planning to live in the woods for an extended period of time.
See our guide to the best survival saw for choosing the best one for you.
Axe
While Axes certainly have their place in the woods, they are not typically what I would refer to as a survival item. However, if you are planning to camp or hunt for an extended period of time, you certainly need one. If you are unfamiliar with using an axe, stick with a saw. Axes are one of the most dangerous tools you can use.
See our guide to the best bushcraft axe for more details on choosing an axe and my favorite.
From the Field
I’ve found that wire saws are more trouble than they’re worth. They’re difficult to use, get stuck easily, and are far more prone to breaking than a quality saw or axe. In a survival situation, the last thing you want to deal with is a tool that requires a lot of extra work. Stick to a reliable Bahco Laplander or a small axe that you know how to use.
Critical Items:
- All Levels: Belt Knife – Condor Bushlore Knife (1 per group)
- All Levels: Multitool – Leatherman Wave Plus (1 per person)
- Level 2 and 3: Swiss Army Knife – SAK Swiss Champ (1 per group)
- Level 2 and 3: Folding Saw – Bahco Laplander Folding Saw (1 per group)
- Level 3: Optional Axe – Warwood Tool Perfect Axe (1 per group)
9. Navigation
With today’s technology, there is no reason to become lost in a remote area.

I wear a GPS watch every day as part of my EDC, and I set my home as a waypoint. If I go hiking, camping, or hunting, I also set my vehicle or campsite as a waypoint. The trackback feature allows me to see where I have traveled and easily find my way back.
Read our full guide on the best survival watch for more tips and our top picks.
I also have a small handheld GPS unit as a backup. These are easier to use than a watch, can be shared with others, and have longer battery life.
Even though modern tech is nice, there could be an issue with your gear or the GPS satellites. People have been using a compass to navigate for hundreds of years. They are small and lightweight, so there is no reason not to have one as a backup.
Read our full guide on the best survival compass for our picks and more details on how to choose one.
A map of the area you are traveling in is also a must, even if you have a GPS unit. I use a map to see areas to avoid and landmarks that I can use to maintain my sense of direction. Make sure the map shows topographical lines to see elevation changes (like cliffs you can’t navigate).
Another survival navigation aid that many don’t talk about is your mind. If you do not always know which way North is, start practicing ways to remember or recognize it. Landmarks like mountains, the angle of the sun at a particular time of day, and trees can all give you clues if you become disoriented.
Critical items:
- All Levels: GPS Watch – Garmin Instinct 2 Solar (1 per group)
- All Levels: Orienteering Compass – Suunto MC-2 (1 per group)
- All Levels: Topographical Maps (1 per group)
- Level 2 and 3: Handheld GPS unit – Garmin eTrex 22X (1 per group)
10. Survival Food
I always like to carry some type of food with me. Typically, it is just a ration or energy bar. While we can live quite a while without food, I have found being hungry has a big impact on my energy levels and mental state.

I like the Millennium energy bars because they have a five-year shelf life and are not affected by temperature. I have tried Cliff bars and some others, but they are not as durable. See our Best Emergency Food Bar Review for our complete test.
For extreme circumstances, I like to keep a few Survival Tabs with me. These little tablets have vitamins, minerals, and just enough fat to keep me going if my time out gets prolonged. They take up very little room and are a good insurance policy.
On longer trips or if I am with more people, I like to keep a few freeze-dried meals with me. Mountain House and Nutrient Survival are my two top picks. Mountain House tastes better, but their meals take up more room and are more expensive. Nutrient Survival’s meals come in small single-serving packs (plus you can save with our discount code).
Freeze-dried meals need hot water to prepare, so make sure you have the nesting cup I mentioned in the water section above.
Also, see our full Nutrient Survival review for our favorite kits and meals.
When I carry freeze-dried meals, I also carry some type of utensil. A plastic spork will do, but I also like the Omni-tensil set that Outdoor Element has. It rolls up into a handy towel. Grayl also has a titanium utensil that is very compact, lightweight, and durable.
Critical items:
- All Levels: Millennium Energy Bar (3 per person)
- All Levels: Survival Tabs (One package for two people)
- Level 2 and 3: Grizzly Gear Rations (1 package for 2 people)
- Optional: Mountain House Meals
- Optional: Nutrient Survival Meals
- Optional: Outdoor Element Omni-Tensil
- Optional: Grayl Titanium Spork
11. Survival Stove
If you have ever tried to boil water and cook over a fire, you know that it is not so easy, depending on how you build the fire and what you have to work with.
Small survival or backpacking stoves can make it much easier, especially when fuel is scarce or wet.
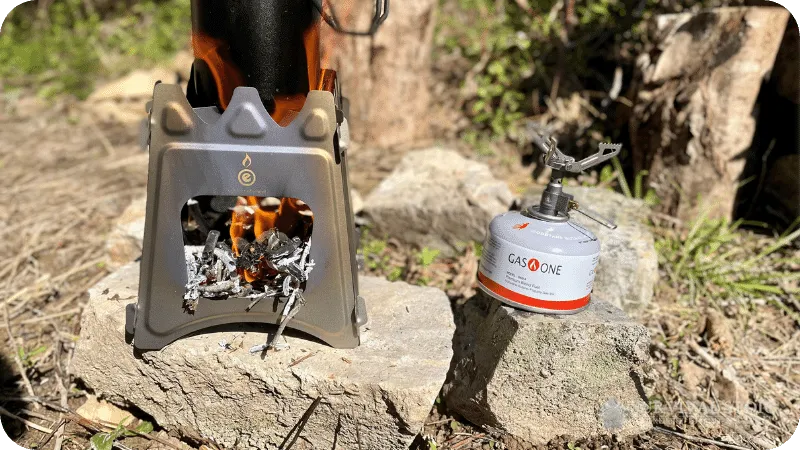
The Outdoor Element titanium stove only weighs 10.8 ounces and folds flat, so it takes up very little room. I have used it to contain a fire using just leaves and small sticks, and it directs the heat while holding my container nicely at the top. With this stove, I can use much less fuel and heat water faster than with a full campfire.
Another option I like is the Grayl titanium backpacking stove. This stove weighs 28 grams (less than one ounce, not including fuel) and uses small backpacking isobutane fuel canisters. With this, I can heat water anywhere, anytime, without needing wood. I can light it with any spark from my lighter or Ferro rod.
They both work perfectly with the Grayl nesting cup I mentioned above.

Critical Items:
- All Levels: Outdoor Element Stove (1 for 2 people)
- Level 2 and 3: Grayl Titanium Stove (1 for 2 people)
- Level 2 and 3: Isobutane Fuel Canisters (1 for 2 people)
12. Cordage
Cordage has so many uses that I include it in all my kits. Paracord is my main go-to since it is strong and can be broken down into individual strands when smaller cords are needed. I can use it to make a quick shelter, a splint for a broken bone, or to help carry items.

For basic paracord, I often use Paracord Planet on Amazon. They offer many different colors and lengths.
Survivor cord is another good option. It is a little more expensive but includes three extra strands. A fire tinder strand, utility wire, and fishing line are built right into the cord, plus the normal strands. I like having the extras in the same amount of space.
I also like Outdoor Element’s Kodiak Survival paracord bracelet. It is truly multi-functional. It includes paracord with a fire tinder strand, two 20-lb-test fishing line strands, and extra nylon strands. The buckle has a built-in Ferro rod and striker. The woven paracord also has a #8 fishhook inside.
If I wear this bracelet and lose all of my other gear, I still have a way to start a fire and even fish if needed.
Critical Items:
- All Levels: Paracord Planet Paracord
- All Levels: Outdoor Element Paracord Bracelet
- Level 2 and 3: Upgrade option – Survivor Cord
13. Lighting
This one seems obvious: You need to be able to see in the dark. Unfortunately, people do not plan to be out after dark, so it is not something they think about.

A flashlight is a basic survival essential. I tend to avoid rechargeable types, as I have a hard time remembering to charge them if I don’t use them very often. I carry a flashlight as part of my EDC, so I typically have one with me most of the time anyway. I do keep spare batteries for it in my vehicle and in my kit, though.
I find a headlamp much more useful than a flashlight since it frees up my hands. I like the Petzel Tactikka Core since it has a rechargeable battery that can be replaced by three AAA batteries. It also has a red light that I can use at night so my eyes don’t have to adjust from light to dark and back to light again.
The Eveready headlamps are a good option if you are on a budget. They are very affordable but do not have a red light.
I also like the Hybridlight Journey 300 Solar Flashlight. It can recharge with the sun and charge other USB devices as well (like my radio shown above in the signaling section.)
See our guide on the Best Survival Flashlight for more of our favorites and testing.
Critical Items:
- All Levels: EDC flashlight – Streamlight ProTac 2L EDC Flashlight
- All Levels: Head Lamp – Petzel Tactikka Core Head Lamp
- All Levels: Budget Head Lamp Option – Eveready LED Headlamps
- Level 2-3: Solar Flashlight – Hybridlight Journey 300 Solar Flashlight
14. Clothing
While I don’t want to dwell on the obvious, many people don’t dress for the weather. When going out for the day, you should have enough clothing for the expected low that evening, even if you don’t plan on being out that late. Just carry a jacket on or in your pack.

I like to carry a good military-style poncho. This is not one of the cheap disposable ponchos, but a full heavy poncho with grommets. In addition to using it as a poncho, I can use paracord to make an emergency shelter or to collect rainwater. Army Navy Outdoors has some good military surplus ponchos or the USGI poncho on Amazon are good choices.
For hats, the Wazoo Cache Cap is one of my favorites. Not only does the SPF50 fabric keep the sun off of my head, but the interior is also colored blaze orange with reflective strips that I can use as a signal. It also has pockets where I can hold small items like cash or fish hooks and lines.
See our guide on the best survival hats for more on my favorite hats.
A banana is another simple item that has many uses. I can use it to filter silty water before I use my Grayl (to help keep the filter clean), as a trail marker, or a signal. The Colter Stayin Alive bandana is bright orange and is another good multi-function tool that takes up little space.
If you have ever been hiking and got your feet wet, you know how bad that can be later in the day. I like carrying a backup pair of wool socks that dry quickly and keep my feet warm.
Gloves are another item that is often forgotten about. A pair of leather gloves keeps my hands warm and allows me to handle hot items around a fire.
Critical items:
- All Levels: USGI Military Style Poncho
- All Levels: Wazoo Cache Cap
- All Levels: Colter Stayin’ Alive Reflective Bandana
- Levels 2 and 3: Merino Wool Socks
- Levels 2 and 3: Mechanix Wear Leather Gloves
15. Device Charger
Your cell phone or radio can be your lifeline to safety. However, when I am in a low-signal area, my phone battery tends to run down very quickly. By the end of the day, it can be almost dead, when it normally isn’t.

I like the QuadraPro Solar charger. It charges my phone wirelessly, so I don’t have to remember and carry charging cables. It also has a built-in flashlight, and I can charge it by unfolding the solar panels. I found that it will charge even in cloudy weather, so I can maintain my phone battery as long as I don’t use it a lot.
For a lightweight option, I like the Battarix charge card. It is about the size of a couple of credit cards and holds a charge for eight years. It comes pre-charged and sealed in a package, so it is great for emergencies. It also has built-in cables for Android and iPhones.
Critical Items:
- All Levels: Emergency Charger – Battarix Charge Card (1 per group)
- Levels 2 and 3: QuadraPro Solar Charger (1 per group) Also on Amazon
16. Field Guide
I can study and practice my survival skills regularly but still forget things. Knowing what to do in a high-pressure situation can be even harder. Keeping a survival field guide with me gives me more peace of mind than anything. I know that if I get caught out unexpectedly and can’t remember the best way to accomplish a task, I have something to reference.
I like Dave Canterbury’s Bushcraft Essentials Field Guide. It is full of information and small enough to keep in a small pack.

Critical Item:
- All Levels: The Bushcraft Essentials Survival Field Guide (1 per group)
17. Self Defense
This often gets overlooked in most survival gear guides. While an attack can happen anywhere, attacks from wild animals or even other humans are possible in remote areas.
I always carry my concealed carry handgun when possible. We have a full concealed carry guide discussing everything from the right gun to purchase to holsters and training.
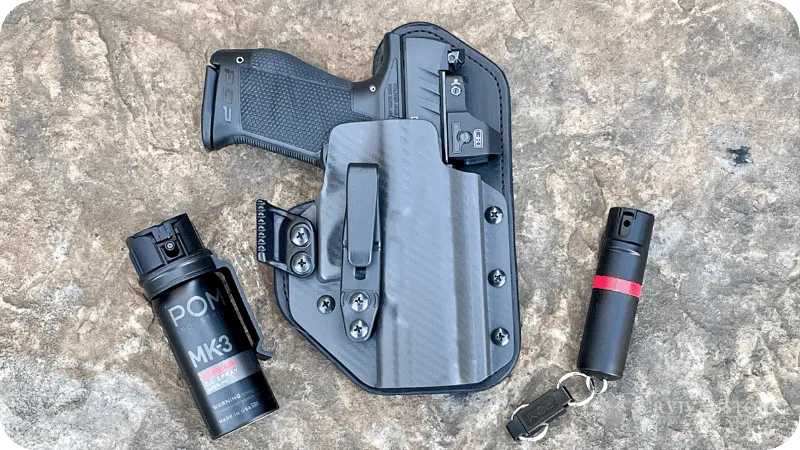
If carrying a firearm is not your thing, consider pepper spray. I keep a couple of small cans of pepper spray in my survival kits. I like the snap version that POM makes. It is easy to use, and the clip makes it easy to carry on my pack.
Critical Items:
- All Levels: Read our Concealed Carry Guide
- All Levels: Read our Best Pepper Spray Guide
- All Levels: POM Pepper Spray (1 per person)
18. Other Survival Items
Here are a few additional survival items that I have found useful.

- Sharpie: I can write on almost anything with a Sharpie. They are useful for leaving a note behind or making notes on my hand/arm (for example, so I don’t forget what bearing I am traveling in).
- Duct Tape: It has so many uses from making shelters to starting a fire. Instead of taking an entire roll, roll some up on a Ferro rod or round item. I prefer the one-inch gorilla tape.
- Carabiners: These simple devices allow me to quickly hang items. I like to keep the Outdoor Element Fire Escape carabiner in my truck. It is not only a carabiner but also has a seat belt cutter, glass breaker, and built-in fire starter.
- Sunscreen and Insect Repellent: I find these very handy when spending “unexpected” time outdoors. Some of the first aid kits I mentioned above include these. If yours does not, add a few small packets to your kit. There is no need for huge bottles here (I linked to a kit below).
Critical Items:
- All Levels: Black Sharpie Marker (1 per group)
- All Levels: Duct Tape – 1″ Gorilla Tape (20ft per group)
- All Levels: Basic Carabiner – Lightweight Carabiner (4 per group)
- Vehicle Kit: Vehicle Carabiner – Outdoor Element Fire Escape Multitool
- All Levels: Sunscreen – My Medic Sun Exposure Pack (1 for 2 people)
- All Levels: Insect Repellant – My Medic Bite & Sting Pack (1 for 2 people)
19. Documents
When a crisis hits, you’ve got your gear, your food, your water, but what about your life? I’ve been through an emergency where I didn’t have access to important documents, like my birth certificate. It makes everything a bit more complicated!
In a disaster, the internet might go down, ATMs will be useless, and your digital life could vanish into thin air. Only hard documents count. That’s why this very basic, boring part of your kit is absolutely crucial.
Keep all your important documents in waterproof bags. It’s a bit of a pain to assemble, but it’s a one-time chore that could save you a mountain of headaches. Consider it your “backup drive.”
- Medical Information: A list of your family’s medications, dosages, allergies, and any pertinent medical information.
- Proof of Identity: Copies of your driver’s license, passport, and birth certificates.
- Key Records: Your home deed or lease, insurance policies (home, auto, life), and bank account information. I know, a bit much, but trust me, it’s worth it.
- Extra Cash: When the power goes out, so do credit card machines. A twenty-dollar bill can go a long way. I always carry at least a few hundred dollars in small bills. It’s a lifesaver when you need to buy gas or a warm meal and the whole neighborhood is suddenly cash-only.
20. Morale and Mental Fortitude
I’ve spent a lot of time in this article talking about knives, tents, and fire starters. In fact, I spend a lot of my time testing knives, tents, and fire starters! But, all gear is useless if your mind starts to fail.
And, trust me, it’s often the mind that starts failing in survival situations before the body.
It’s surprisingly hard to stay calm when you’re cold and wet (or hot and thirsty).
That’s why I highly recommend packing a few items designed to do one thing: keep your spirits up. Don’t cut these out just to save a few ounces. They matter more than you might think.
Comfort and Caffeine
Dehydrated bug-out bag food is great (and, yes, it should be tasty). But small luxuries can make all the difference when SHTF. Just ask any veteran: a packet of instant coffee can make all the difference.
- Coffee & Tea: A few instant packets take up virtually no space but provide a huge mental boost. It’s a taste of home in a world that just got a whole lot more uncomfortable.
- Candy Bars: I always have a few high-calorie candy bars in my pack. It’s not just about the sugar. It’s a small reward that can give you the energy and mental lift you need to keep going.
Combatting Boredom and Stress
As we’ve seen in online discussions, a little entertainment goes a long way. When the crisis drags on, boredom and anxiety can eat away at you. I’ve found that simple items, especially for families with kids, can keep everyone from losing their minds.
- Deck of cards: It’s cheap, small, and can provide hours of distraction. It’s an instant morale booster and a simple way to pass the time when you’re just waiting it out.
- Small book or notepad: A paperback takes your mind off of the current situation and a small notepad is great for jotting down notes or playing games.
- Games for the Kids: Something like Go Fish or Uno can make all the difference for your sanity if you have children.
Customizing Your Survival Kit for Your Reality
A pre-packaged survival kit might seem like a great start, but it’s kind of like buying a car with a flat tire. It’ll get you a few feet, but it’s not going to get you where you actually need to go.
The brutal truth is, your survival gear needs to be built for your specific environment. The same kit that works in a suburban neighborhood won’t save your skin in the backcountry of Montana. So, let’s get personal.
What are the two most important questions you need to ask yourself when building your kit?
1. What Sort of Emergency Might You Face?
It’s tempting to prepare for the apocalypse, but being realistic is what saves lives. Someone living in California needs something vastly different from someone living in Canada.
Why? Because they face different threats.
If you’re in an earthquake-prone area, you need tools to shut off gas lines and a kit that can survive being rattled to hell. If you’re on the coast, a waterproof bag and life vest are non-negotiable.
Don’t get me wrong, I love my ferro rod, but it’s not going to help if your house is underwater.
2. Where Will You Be Using the Kit?
The environment you’re in will dictate your every move. My experience in high-altitude terrain taught me that extra insulation and a high-quality shelter are more important than almost anything else.
Your bug-out bag for the desert needs to prioritize water filtration and storage above all else. In a cold climate, a second pair of socks and a warm sleeping bag are pure gold. Your kit is a reflection of your surroundings.
Take a hard look at where you live, work, and travel. What does your reality demand? Answering these questions is the first step to building a kit that won’t make you question your life choices when things go south.
Tailoring Your Kit: Essential Supplies for Every Family Member, Pet, and Special Need
Most survivalists talk about water filters and knives. That’s great, but let’s be honest: the perfect bug-out bag is completely useless if you forget that your kid needs an inhaler or your dog, bless his heart, has to eat a very specific brand of kibble.
My own experience has taught me that a well-stocked kit is a family affair. And by family, I mean everyone and everything with a pulse. This is a crucial, often-overlooked step that separates a generic list from a truly effective one. It’s all about personalization.
Let’s get into the weeds:
Survival Gear for Tiny Humans: Babies
If you think managing a baby is hard on a Tuesday, try doing it without power or running water. Babies have unique needs that just can’t be improvised. As a parent who’s been through an EF4 tornado, I can tell you that a baby’s needs suddenly seem a lot more complicated when an emergency hits.
Here’s what you should consider stocking up on for your little ones:
- Bottles & Formula: If your baby is on formula, pack enough for at least a week. Trust me, this is one of the first things to fly off the shelf, so stock up on it now.
- Baby Food: A few jars of pureed food or pouches are a no-brainer. They’re non-perishable and a lot easier to deal with than trying to mash something up yourself.
- Diapers & Wipes: Pack more than you think you’ll need. You can never have too many.
- Medications: Any prescription medication or over-the-counter meds your baby needs. Don’t leave home without them.
Keeping the Little Ones Sane: Kids and Morale
You’ve got the water and food squared away, but what about the whining? Kids tend to become harder to settle during an emergency. They become pickier. They’ll suddenly need loveys they haven’t touched in years. Things like a deck of cards or a small toy can be a game-changer.
- Games & Activites: A small deck of cards, a few crayons, and a notepad are lightweight but worth their weight in gold. A coloring book is a great distraction from, you know, the total chaos outside.
- Comfort Items: A favorite stuffed animal or a small blanket can provide a sense of security that no amount of gear can. We’ve learned through experience that it’s all about keeping their spirits up.
Don’t Forget Fido: Pet Preparedness
Our four-legged friends are part of the family, and their needs are just as vital. It’s easy to forget about them when you’re grabbing your own kit. My dog, for example, is a picky eater, and I’ve learned the hard way that you can’t just throw him any old thing.
- Food & Water: Pack a week’s supply of their regular food, plus a water bowl and a gallon of water. One of these collapsible bowls works well, in my opinion. Just make sure it has a lid like these.
- Collar, Leash, and ID: Make sure your pet is wearing a collar with up-to-date tags. A leash is also critical. If you have to evacuate, you can’t be trying to wrangle them at the same time.
- Carrier: If you have a cat or a small dog, a carrier is essential. It provides a safe space for them and makes evacuation much easier. Some emergency shelters even allow pets in carriers.
Remember, you’re trying to keep everyone alive, and that often means customizing your gear to the extreme. No pre-made list is going to cover your needs completely.
Maintaining and Storing Your Survival Kit
Building a survival kit is a solid first step. However, it’s just the beginning. A kit sitting in your closet for five years is probably useless. The food is expired, the batteries are dead, and the gear you thought was a good idea back then might not fit your needs now.
Maintaining your gear is just as important as buying it in the first place. In this section, I’ll outline exactly when and how you should upkeep your gear.
Store It Right, Don’t Ruin It
Proper storage is crucial for keeping your gear in top shape. Here’s what I’ve learned from years of keeping my kits ready to go.
- Cool & Dry Is Key: Store all canned and boxed food in a cool, dry place. I keep mine in a plastic tub in the basement, away from the water heater. Heat and moisture are the enemies of shelf life.
- Airtight Containers: For any items that come in cardboard boxes, like salt or sugar packets, transfer them to airtight, rodent-proof containers. A simple plastic food storage container works perfectly.
The Annual Checkup
This is the most critical part of the process. I mark a day on my calendar every year to go through all my kits. It doesn’t take long, and it’s a huge peace of mind.
First, check expiration dates on food, water, and medication. Use and replace any items that are nearing their expiration date. This is a perfect excuse to use that dehydrated food you bought and see if you actually like it.
Next, check and inspect your flashlights, radios, and any other electronics. Make sure your water filter still works. Take a quick look at your cords, ropes, and tarps for wear and tear.
Seperate Kits for Every Scenario
As my team and I know from experience, you’re not always going to be at home when disaster strikes. That’s why you need to have separate kits for different locations.
- At Home: The “Shelter in Place” Kit: This is your largest kit. It’s for when you can’t or don’t want to leave your house. My home kit is a large container in the garage, ready for a multi-day event.
- At Work: The “Grab and Go” Bag: You spend a third of your life at work, so a kit there is a no-brainer. This is your small “go-home” bag, containing the essentials you need to get home safely, no matter what happens.
- In Your Car: The “Go-Home” Vehicle Kit: A kit in your car is an absolute lifesaver. This is for when you’re stranded on the road or need to get home and can’t rely on your car’s features.
Get Familiar with Your Survival Gear
As I mentioned, a big part of our survival mindset is building our own kit and getting familiar with each item.
Take your gear out in the woods and imagine you are lost or stranded. Pitch your emergency tent, build a fire, and signal for help. I like to practice a scenario when someone in my group gets injured and cannot walk. I should be able to get them under a shelter and start a fire in less than five minutes. I should also be able to communicate my exact location with my GPS and from a map.
Generally, the more survival skills you have, the less survival gear you need.
Now that you have everything you need to survive check out our How to Start Prepping guide. It has everything you need to be prepared for emergencies at home or when traveling. If you are on a budget, see our guide on is military surplus worth it for tips to save money.
Also be sure to check out our guide on how to backtrack when lost. If you ever do become lost, it will help you find your way back to safety.
